You are currently viewing Violin Finger Placement – High And Low Seconds And Thirds

Violin Finger Placement – High And Low Seconds And Thirds

Hi Guys,

Today I’m going to be discussing correct violin finger placement. I’ve met with many students over the years who just can’t understand why their intonation is so poor; they can hear that they’re not hitting the right notes but they just don’t know how to rectify the situation. 

It’s only when we begin peeling back the layers that we discover fundamental issues in violin finger placement or in other areas of basic technique which should have been mastered months, or even years ago. 

Let’s take a look at some of the common issues with your left hand and fingers before we go into the AMEB preliminary exercise called push ups. This exercise is perfect for getting your second and third fingers moving into different placements in first position. 

The Four Crimes Of The Left Hand

Take a look at the set of slides below and see if you recognise any of the issues in your own left hand or fingers; I can think of about 10 students right this minute who will identify with at least one of these.

Forceful And Inappropriate Standing Up Of The Left Fingers

AKA - Left Hand Crime #1

Damage Caused: Inaccurate intonation, difficulty in maintaining the correct left hand and finger position, tension in the left hand and wrist and an inability to move accurately from one finger to the next in faster passages.

This one is really common. If you’ve read some of my other articles, you’ll know that I talk a lot about standing your left fingers up nice and tall on the fingerboard. This is definitely something you want to do but to an appropriate extent and this appropriate extent will vary depending on the placement of the finger in relation to the other fingers.

Let’s take a look at the picture above:

You can see that the third finger is stretched away from the low second. You can see that all three fingers are standing up very tall. Look more closely though, the second finger has been pulled away from it’s correct position on top of the first finger. It is virtually impossible to keep the second finger in its right spot with the third standing up so tall. What you might not be able to see is that the left hand and wrist are also very tight. This position with all three fingers forced to stand up tall is exceedingly uncomfortable and simply not conducive of a relaxed hand or wrist. 

Now look carefully at the picture below:

you can see that the first and second fingers are standing up quite tall but the third finger is placed at a different, more relaxed angle. It is not completely lying down and it’s certainly not bent inwards but reaches comfortable to the position of D# (in this case) by moving away from the first and second fingers on an angle. This is the correct violin finger placement for the D# third finger; the left hand and wrist can remain relaxed and comfortable and the second finger does not get pulled up, away from it’s correct position on C natural. 

What Can I Do?

This problem is REALLY difficult to fix if you don’t get on to it quickly. The biggest blocker to overcoming the issue is that you can get away with playing like this for quite some time. You may experience a little bit of tension in your hand or you may find it more difficult to reach the high third finger position, but on the whole, you can continue quite well without making any change. 

As we head into more difficult keys and double stops, we start to see very clearly the problems that are caused and by this stage, left hand crime #1 has entered the emergency zone.

Before you begin your practice each day, spend at least five minutes sliding each finger from low to high position on the string. Focus particularly on the third and fourth fingers because these are the ones that cause the most trouble here.

Lying The Wrist Out To The Left

AKA - Left Hand Crime #2

Damage Caused: Inaccurate intonation, tension and pain in the left hand and wrist and an inability of the left fingers to move quickly from one string to the next. 

If I had a dollar for every time I had to rectify this problem, I’d be a millionaire by now! This disaster is easily identifyable becuase it closes off the mouse hole, something that I talk about so often in my posts and videos. It happens when students try to move across to higher strings and instead of moving their fingers over to the correct string, they lean their wrists out to the left and sort of lie their fingers down.

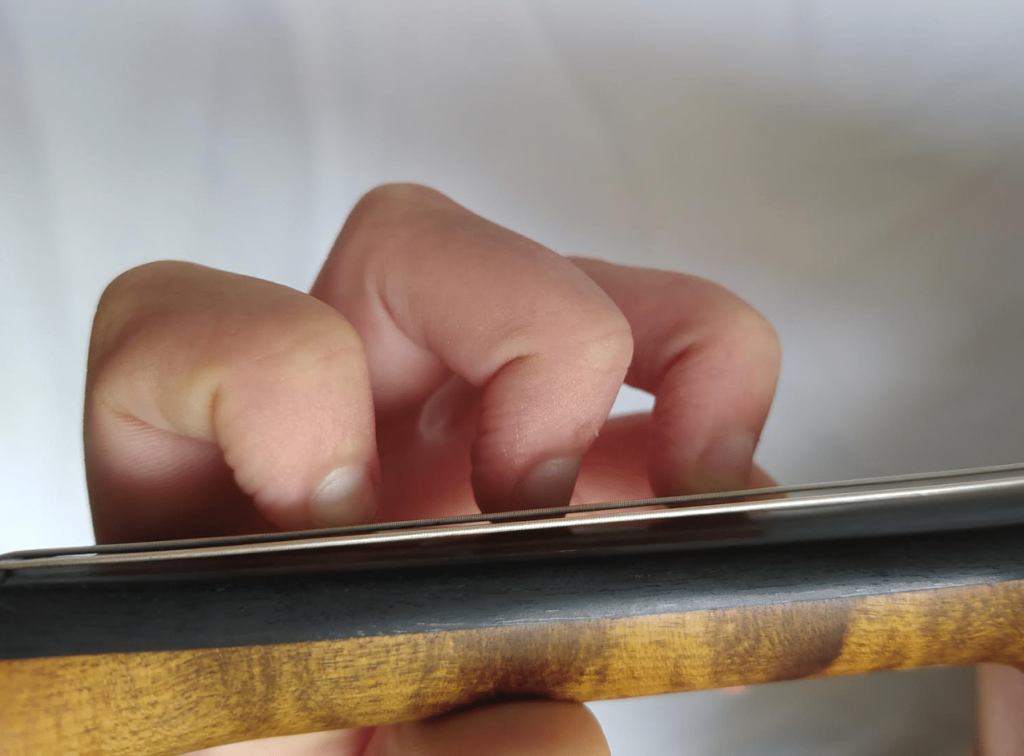
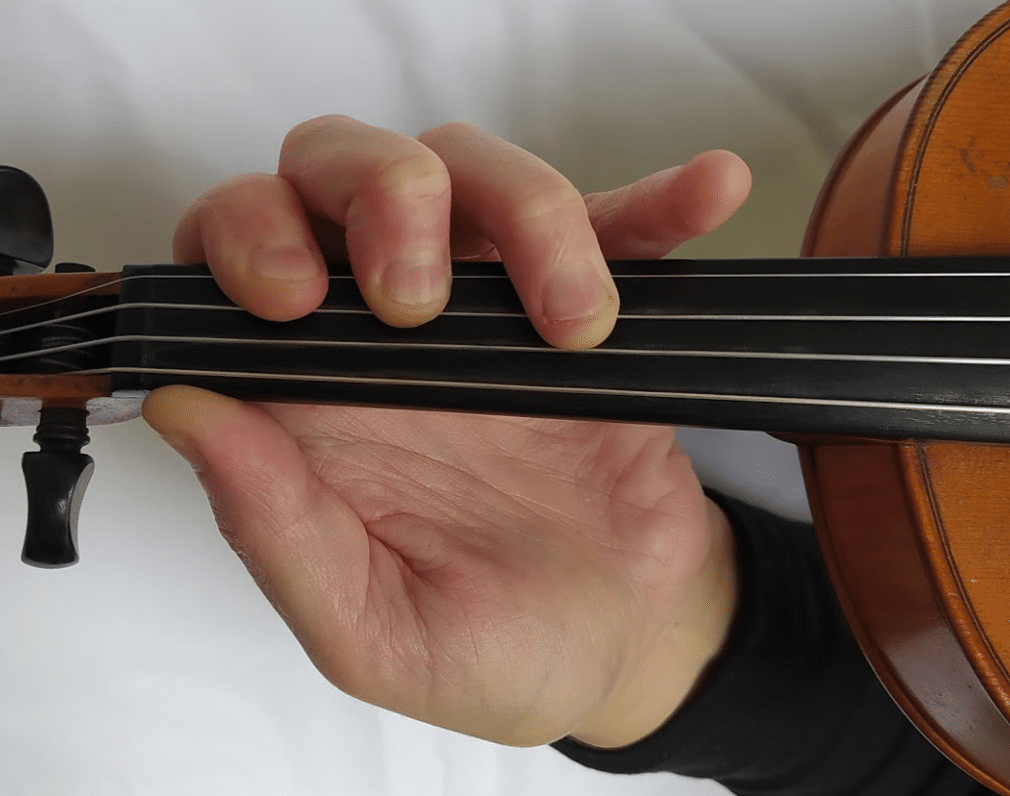
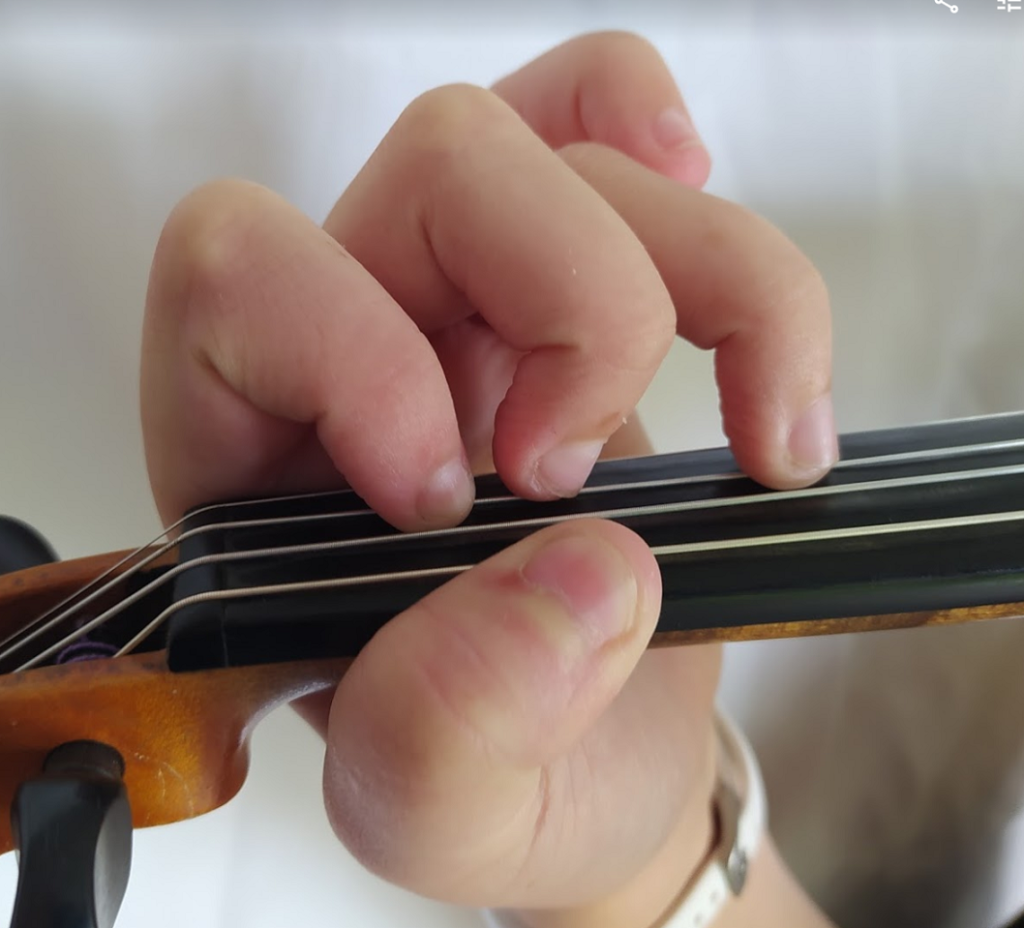
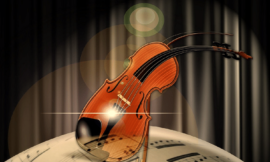
Take a look at the above picture:

You’ll see exactly this! Looking at the fingers on the strings, it would be difficult to tell whether this student is playing on the A or E; their fingers tips are more on the A string, but the fingers are also lying across onto the E.  Now take a look at the wrist and hand position; it’s jutted out to the left. Although you probably can’t see it in this picture, the mouse hole is closed. 

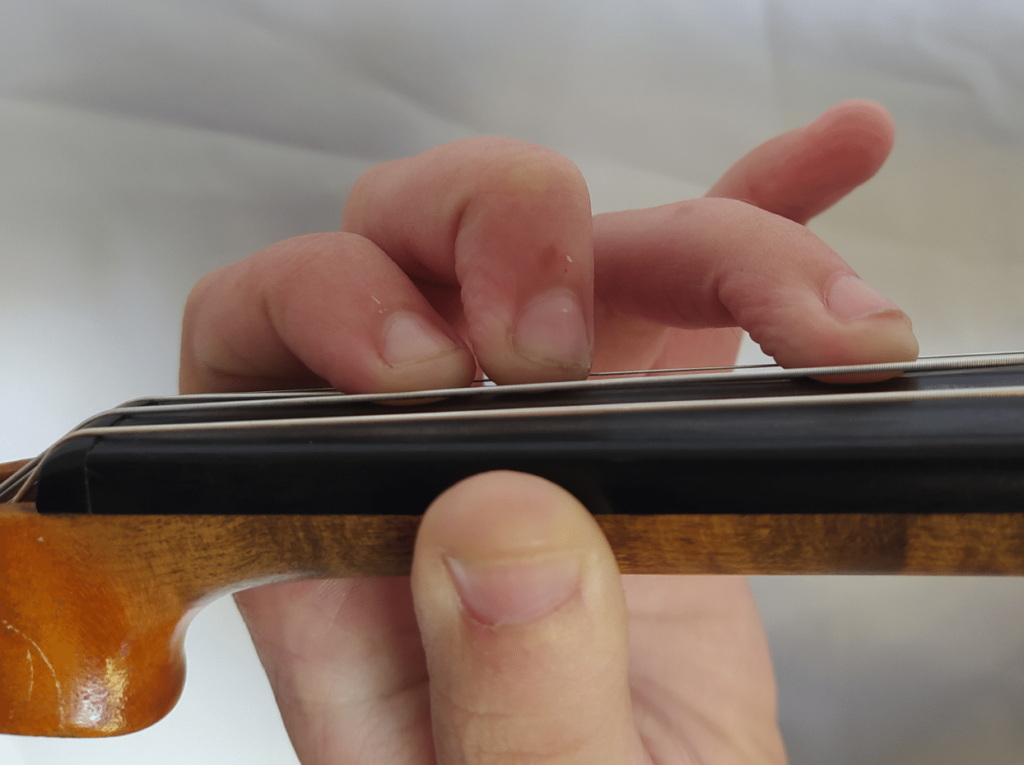
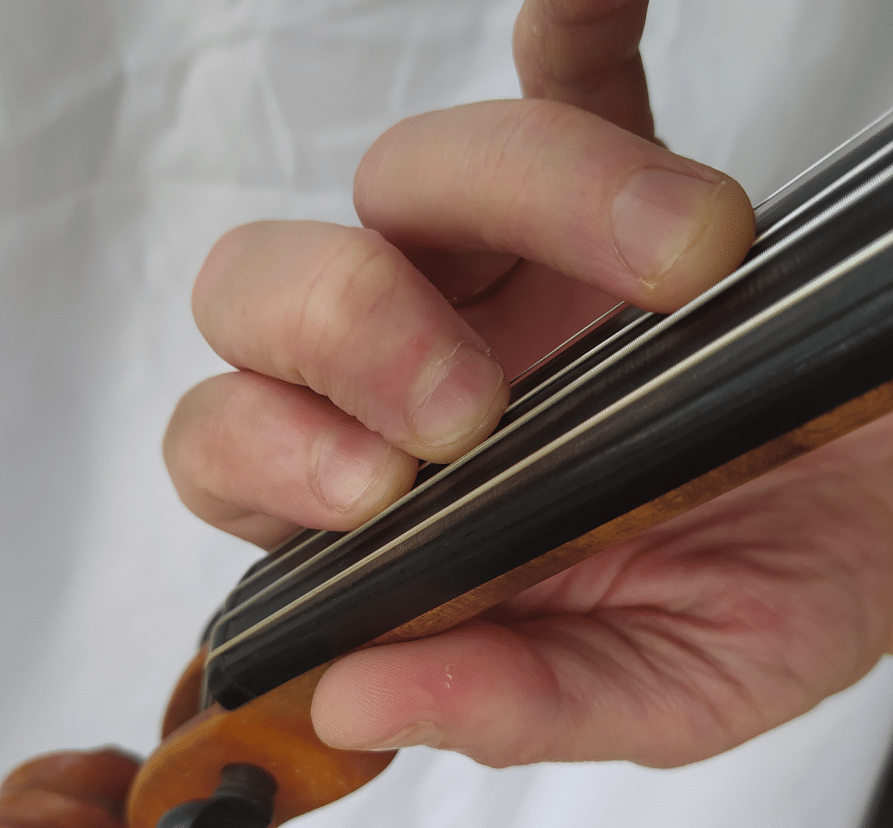
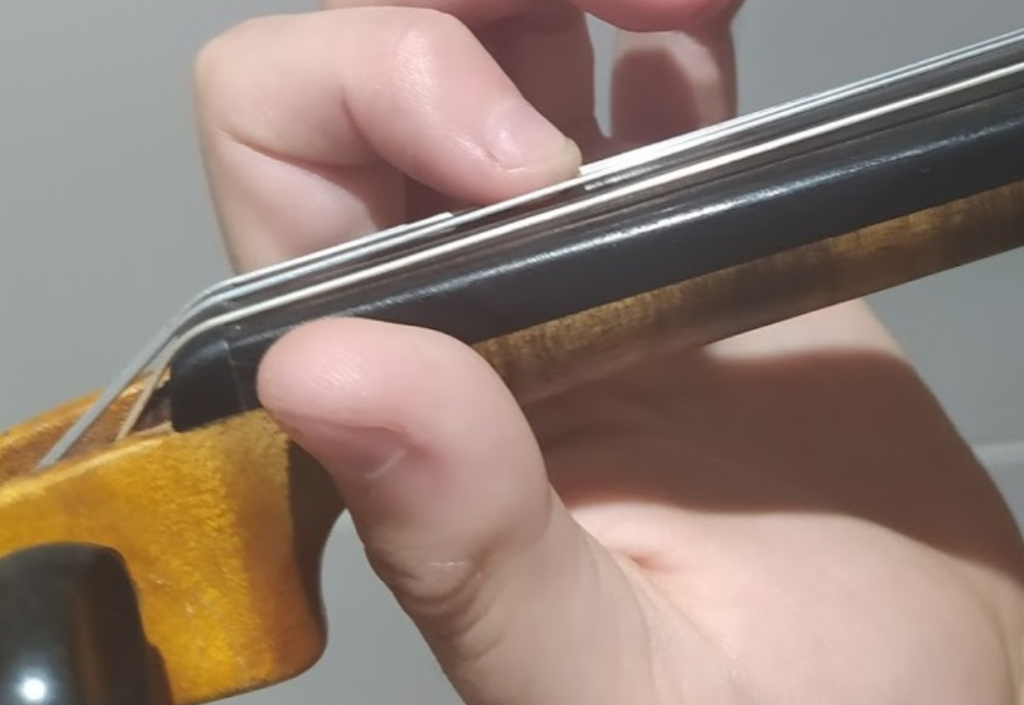
Now look at the picture below:

This shows what we want to see. Notice that the fingers are standing up nicely (third on more of an angle as discussed above) and it’s obvious that they are on the A string. The mousehole is maintained and the left wrist and hand are loose and relaxed.

What Can I Do?

Spend some time at the beginning of each practice session playing though my busy busy stop stop exercises.

You could also play A, E, A1, E1, A2, E2, A3, E3, A4, E4 and then go back down again. This exercise will force you to really take note of how you move your fingers across from the A to the E string and back again.

Try this on other pairs of strings but note that it is most problematic for the A to E string change. Ensure that as you do this, your left hand remains in the correct position and the mouse hole is not closed at any stage.

Bending And Tensing The Left Thumb

AKA - Left Hand Crime #3

Damage Caused: discomfort or even pain in the left hand and wrist when playing, difficulty in stretching fingers (especially the 3rd and 4th) and an inability to maintain accurate intonation, especially in higher positions. 

Look at the picture above:

We can clearly see the offending thumb. Look how weird and uncomfortable it looks and note how it is causing the left hand and fingers to tighten and stand up too much. When the left thumb is bent, it is almost impossible to achieve correct violin finger placement. The bent thumb in turn causes the mouse hole to close and the left hand to become misshapen. 

Now let’s take a look at the picture below:

Here is a close up of the left thumb. Notice its position on the neck of the violin; the thumb sits next to the first finger and appears relaxed. Also notice that the mouse hole is well shaped and the thumb is not bent.
Look at slide seven where the thumb is positioned too high. When I took photos for this post, bending my thumb or placing it too high above the fingerboard was by far the most painful error. 

The tension I required in my left hand and wrist was something that I couldn’t bare for even a minute, let alone the time it takes to play an entire technical element or piece of music.

What Can I Do?

Go through my busy busy stop stop left hand exercises and focus on maintaining the correct thumb position and shape throughout. Take time out from your usual practice program and choose some super easy scales where you can maintain your thumb position and focus your attention purely on rectifying the bent thumb. 

Form Over Function – A.K.A Long Nails

AKA - Left Hand Crime #4

Damage Caused: Discomfort or even pain in the left hand and wrist, left fingers that want to lie down, unreliable intonation and decreased sound quality.  

You simply cannot achieve correct violin finger placement with long nails; your fingers will need to lie down on the strings in order to achieve an acceptable tone quality and this is highly detrimental to your technical development.
If you’re wanting to maintain beautiful long nails, playing the violin is probably not a good option! 

There’s really no exercise or advice I can give you for maintaining long nails and playing the violin other than cut your nails!

Let's Start The Exercises!

Before you begin, stand in front of a mirror and play A, A1, high A2, A3 and watch your left hand and wrist. Try doing the same thing with a low A2 and also on your other strings. Look out for each of the four left hand issues described above and pay attention to whether your left hand and wrist feel relaxed or whether they feel tense. 

If you have any left hand issues, it’s important that you address these before moving on to more difficult material. Check out my busy busy stop stop left hand exercise which goes through basic left hand technique. You could also revise the twinkle variations as these will give you the opportunity to focus on your left hand while crossing strings and playing a variety of notes on the A and E strings. 

As always, strong technique is an imperative part of becoming a strong and confident violinist. Take the time to address any issues before moving forward. 

Changes Of Finger Placement

Low Second Finger
High Second Finger
Third Finger
High Third Finger
This Is Really Bad
Previous
Next

There are two finger placement changes required to play exercise PC; one is the movement of the 2nd finger from low to high position on the A string and the other is the movement of the 3rd
finger from low to high position on the D string. 

Before launching into the exercise, practice moving your second finger from C natural (low second) to C# (high second) on the A string. Move up and back with the finger and pay attention to the slide, not lift of the second finger. Your second finger should remain pretty upright in both placements, but lies down slightly more as it stretches to the high second violin finger placement. 

Now try the same thing using the third finger on the D string. Place your third finger on top of the F# (high second) and practice sliding it from this position (as G natural) to G# (the high third). Notice that as a high third, the finger is far less curved and appears to ‘lie down’ more; it is still curved but far less so than when it was in the G natural position. Slide up and down with the third finger and get used to this feeling. 

Practice your second and third ‘push ups’ and ‘push downs’ until you can maintain good intonation and are free of tension or any left hand technical errors. 

Exercise PC - Push Ups

The above video provides you with step by step instructions on how to play AMEB Exercise PC – Push Ups.
Take time to work through the last bar of each line where two crotchets are separated by two crotchet rests. This seems so easy but most students don’t do it well and end up creating a really rough sound when they stop their bow. Keep your bowing hand and arm relaxed and stop gently on the string. 

Don’t forget that the quavers in each line should be played with no more than half a bow in the lower half and the crotchets should be played with whole bows. You could practice the rhythm of the first line on the open D or A string, focusing carefully on how you divide your bow; this will certainly lead to improvement in sound quality. 

Congratulations!

Having worked through this video and post, you’ve not only identified any errors in technique that could cause incorrect violin finger placement but have also learned to play AMEB Exercise PC – Push Ups correctly.
Take time to regularly practice not only the exercise but also the warm ups and keep focusing on solid left hand technique. 

 If you have any questions about violin finger placement or anything else violin related, please do reach out via the comment section below or through social media. 

Best of luck in maintaining a loose and relaxed left hand! 

Marketa 😉

(founder of myviolinbff.com)

This Post Has 22 Comments

  1. Sylvia

    Boh. That is what I meant in my comment on the previous article. I would break my fingers; it sounds so complicated, but practice makes the master with everything. So I really believe if we all would practice playing the violin, we get used to the movements of our fingers. It is always practice! Thank you very much, Marketa! Excellent explanation!

  2. Christine

    In the first pictures of each wrong finger placement the fingers looks strained and tense, in an uncoomfortable position. In the second photos where it is corrected, the fingers look more relaxed and less tense. The difference is very clear. I can imagine that someone may not notice while playing. Does having short or long fingers also make a difference? Is it easier to place your fingers when they’re long? I was just wondering about it …

    1. Marketa

      Hi Christine,
      Most of the students I’ve dealt with have been able to find a comfortable strategy to play well. Sometimes students with particularly short fingers find double work or high positions difficult but… as the saying goes – where there’s a will there’s a way!
      Have a great day and thanks for your input 🙂

  3. Kate

    Good evening, your article has been such a help that I’m now incorporating it into my scales and arpeggios at the start of my practice, I find it helps with bow control as well. I do apologise for not replying to you after my first comment in September last year, I really struggled with the pain I was getting and I was very ill with other stuff going on but since then I have been doing exercises every day to strengthen my tendons in my hand and fingers which also helps. I find the G and the E strings the most challenging but with your advice and this great informative post I’m positive that it’ll become easier every day……Kate😊

    1. Marketa

      Hi Kate!
      Thanks so much for getting back to me about this. I’m so glad that my article has helped you and that you’re finding it easier. Please do let me know if there’s any other technical areas you’d like me to write on; I’ve been MIA since COVID hit but back to it now 🙂

  4. Oli

    Hello there! I find your website really educational, thank you for the pictures, they help a lot.
    My finger placement doesn’t really give me problems with intonation but I have a hard time descending scales: A minor, for instance, in first position, requires replacement and adjusting of the fingers during it, which makes my tone bad on some notes:

    On A string, for instance, it will sound:
    E(4th)- okish, but a little weak not due to muscle stregth only, but to placement as well;
    D (3rd)- good- 3rd always sounds way better than any other;
    C (2nd)- terrible. 2nd gets on the string on a weird angle, partially on the fingernail. So I always have to replace C and C# right before I play it, because I can’t leave D (3rd) and C(2nd) on the string at the same time. Hence, there is always a bump in the begining of my Cs, like I’m shifting, when I’m actually on first position.

    And, finally, B (1st)- it’s not as bad as C(2nd), but it feels wrong and unconfortable. I don’t have to replace it before playing a B, but the tone starts off weak and then I have the time to adjust it…

    I really think this is an understanding problem, not a strength/ stretch problem.
    My hands are small and my fingers are thin, but not remarkably I think.

    Please send help?
    Thank you so much!

    1. Marketa

      Hi Oli!
      I’ve been away for quite some time over COVID but back to it now; I hope my message won’t be too late for you. I’m thinking that you’re talking about the melodic minors where we need to do jump back fingers. You’ve just given me a great idea for my next article and video – jump back fingers! I’ll get onto that this weekend and send you a link. I feel that your issues are probably due to too much tension in your left hand and wrist. If your violin is the right size for you and your left hand and wrist have good technique, you shouldn’t have any issue with placing your fingers correctly. Let me get onto that video and article for you 🙂

  5. Kate

    Good afternoon, I live your post on violin fingering as I find it quite hard as my fingers don’t spread naturally so at the moment I try and do exercises to help strengthen the tendons etc. The difficulty I really have is places like going from f sharp on the E string – g ( where the fingers are close together, the sharps are not so much as an issue. Also I’m not sure if your supposed to rotate your hand/wrist to reach other notes the higher or lower up the fingerboard you go. I get pain in my wrist sometimes and going up my forearm and not certain if this is to do with my positioning or not. Sorry for such a long post, kate

    1. Marketa

      Hi Kate and thanks so much for your comment,
      This is such a common thing but usually there are issues with the way you are holding your violin or too much tension in the left hand and wrist. If you can, please send me some photos to marketa@myviolinbff.com and I’ll take a closer look.
      Have a great day and best of luck with your violin playing
      marketa 🙂

  6. Miriam

    This is very good website. In fact my grand daughter play the violin. And a few of my daughters friends, their kids play so. I’m going to share this with them. You have a lot here to teach them. This could be very good for them, during this lockdown.

    1. Marketa

      Hi Miriam and thanks so much for your thoughts,
      Please do share with your friends and family members; I really hope that my experience and knowledge can be helpful to as many people as possible. Have a great weekend
      marketa 🙂

  7. Jeff

    I noticed violin finger placement is very similar to playing the guitar, you have to place your fingers and your hand in pretty much the same position to receive the best sound.

    I have a question for you my violin teacher, I am left-handed so does this lesson apply the same to me as for people who are right-handed for how to hold and play the violin?

    Jeff

    1. Marketa

      Hi Jeff,
      All my students, both left and right handed over the years have still played violin the same way. There are left handed violins but I feel that the work you need with your left and right hands and fingers is approximately even, just different so you’d probably be best to just stay using a usual violin and your left finger work will be easier than the right 🙂

  8. Kevin

    Hi there,
    I played violin when I was young but then stopped. Ive gone back to it recently and it’s way harder than when I was younger. I thought I’d just get right back where I left off, but it’s not really so easy. Do you know how I could improve?

    1. Marketa

      Hi Kevin and thanks for your comment,
      It is more difficult for adults and often it’s a case of trying too hard. Kids just don’t care as much. Their parents pay for lessons, they don’t usually have ideas about what they want to play or where they want to be in five years time and they are just loose and floppy in their hands and arms. Adults tend to be more tense and this creates a lot of issues. Try and really relax when you’re playing and take it in baby steps. Best of luck with your violin journey 🙂

  9. Kathy

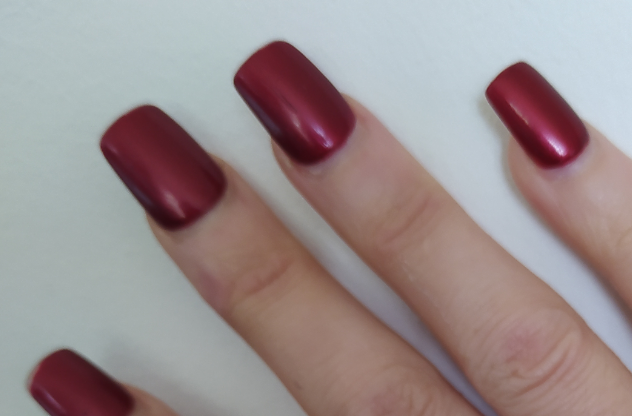
    This is a really interesting demonstration of how not to position your fingers while playing my violin. I can imagine the pain of trying to play if your fingers are bent the wrong way. Yes, long nails would definitely make it impossible to play, and even damage the violin!

    1. Marketa

      Hi Kathy and thanks for your feedback
      I hope this post and others will help you along the way with your violin journey 🙂

  10. Prav

    I have two left hands when it comes to music and two left legs when it comes to dancing. I am always jealous of people who can play music and or dance and worry about my children who are learning violin that they have inherited my lack of musical ability. I am sure such detailed articles will help them learning to play violin 🙂 All the very best.

    1. Marketa

      Hi Prav and thanks for your comment,
      Sometimes people think that they aren’t capable of learning to dance or play an instrument when really, it’s just that they never learned at all or correctly. I’m sure your children will do well provided that they are taught well and pay attention to correct technical development
      Best wishes 🙂

      1. Seith Campbell

        Hey there and thanks for this informative article. I really am struggling to get the high second and third to be close enough together. This is really helpful. I find it uncomfortable though. Do you have any other tips?

        1. Marketa

          Hi Seith and thanks for your interest,
          I actually know exactly what you mean and have students in the past who’ve had the same problem. Try reaching the second finger a little more from ‘below’. So, of course you want to stand your fingers up, but sometimes students do this too much and then it’s virtually impossible to get the third finger to be close. I hope this helps. Feel free to send me a video or photo at marketa@myviolinbff.com if you’re still struggling 🙂

Leave a Reply